Last year I saw a few of these mouse hole pumpkins and I really wanted to make one. The problem was that I just couldn't get the drill to stay charged. Well last Christmas my husband got a new drill. However the pumpkin was packed up for the year.
When taking out the halloween decorations for this year, my son found all of my Halloween magazines. Can you guess what his favorite pumpkin was? So I knew that I would be finishing the mouse hole pumpkin this year.
Michael's had these mice / rats in packs of 4 for a good price. I finished drilling the holes in the pumpkin (the fake kind). It was pretty messy drilling the large holes. Then I tried hot glueing on the mice. No good. The mice did not like the hot glue. I then tried tacky glue, but that didn't work either. Next I turned the mice upside down and spray coated them with clear spray. After that, the hot glue worked. However they could still easily come off, so I am not going to be picky about how much glue that you see. My son loves it and found a special shelf just for it.
The other night I made this black plastic bottle ring wreath, and I decorated it today. I changed the pattern a bit from the Christmas wreaths. Directions: I use about an E/F hook. Chain 20 stitches, take the ring off of a plastic bottle and double crochet around it, slip stitch into that first stitch, then triple crochet in each stitch for the 2nd round, slip stitch into the first stitch from that round, and chain 20 stitches. Tie your chained stitches to form the loop. I just used some tacky glue and Halloween sequence to decorate it.
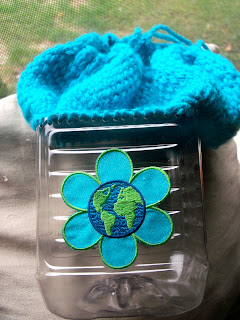
Remember my plastic bottle drawstring bag? Well it was a little bare and in need of some embellishments. I found some cute "go green" patches at the craft store and thought that they would look really cute on the bag.
I just used some hot glue to attach them. I'm filming how I made it on Friday at the t.v. studio. The episode will be on crafting with plastic bottles. I'll also include how to make the plastic bottle ring wreath ornaments, the bottle cap pincushions, and plastic bottle cord.
Here is the plastic bottle cord. I made it by cutting the bottle in a thin spiral. I then held a blow dryer between my knees on the highest setting, and I pulled and twisted the plastic over the blow dryer. I'm thinking that I'll use this as a necklace cord.


girl, you should get out those twilight books. i'm debating about adding mine, but it might be too much with what i already got going on.
ReplyDeletelove that mouse pumpkin! i told my boyfriend about such a pumpkin when i was buying the mice i have out. it is a departure for me, but i LOVE it!
Okay, the mouse hole pumpkin is a little creepy for me. I really like your purse tote and the thin plastic cording you made. Very nice.
ReplyDeleteNice job on the mouse pumpkin. I made a similar one that I'll be blogging about tomorrow. I saw you on Sew Much Ado. :)
ReplyDeleteThose pumpkins are SUPER cool! I love the Plastic Bottle Drawstring Bag too, I would have never thought of that!
ReplyDeleteSaw you on Sew Much Ado =)
I wonder if those pumpkins are on sale yet - they are a great option for those of us in the warmer climate. Thanks for sharing
ReplyDeleteAl, The craft store does have some on sale. I wait until after Halloween to buy mine. That way I get an even better deal on them.
ReplyDeleteooooh....I LOVE the mouse hole pumpkin idea! You did a great job!
ReplyDelete