Monday, December 5, 2011

365 Items in 2011: Update

Since this is the last month of the year, I wanted to bring up my main New Year's Resolutions.  It was to make 365 items during 2011.  Well I have almost doubled that.  So far I have made 688 items this year.   I'm thinking that next year my goal will be 650.  I know that I've passed that number, but I don't want to kill myself trying to out do this year's total.


Total Items Made: 688
This includes 37 quilt blocks.
January's total: 106
February's total: 52
March's total: 73
April's total: 48
May's total: 89
June's total: 17
July's total: 50
August's total: 18
September's total: 96
October's total: 42
November's total: 65
December's total: 32

Who else has participated in this challenge /  resolution?

Wednesday, November 30, 2011

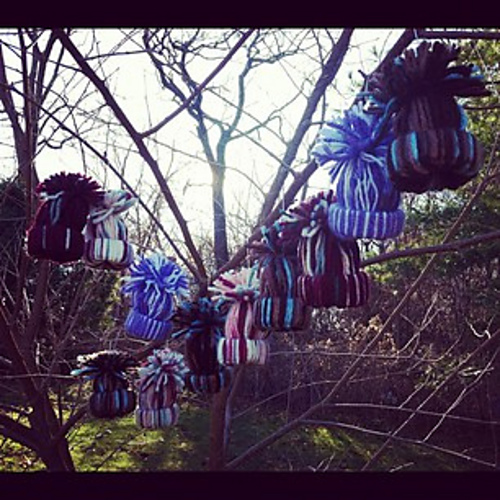
Hat Ornaments

Yesterday and this morning I made these 8 hat ornaments.  Two of them are on my Christmas tree right now.  I'll save 2 more of them for gifts, and the others will be donated to my church's craft fair.  I have a lot more to make before the craft fair's deadline (this Friday).  

Below is the video tutorial that I made last year on how to make these hats.  All you need are scissors, a toilet paper tube, and yarn.  The new ones use a wire hanger instead of yarn to hang them on the tree from.

Tuesday, November 29, 2011

Red Angry Bird


I just finished crocheting this red Angry Bird for one of my nephews for Christmas.  Now to make one for my youngest son.  The pattern is available for free through ravelry.

Tuesday Tot Craft Time: Dress Me Up Scarecrow

This is an oldie but a goodie.  We did this one last year, but it was fun making a new one with friends.
We took one paper with the outline of a person on it and one paper with a hat, shirt, and overalls on it.  While I cut out the person, my son colored the clothes.
My son is really into using scissors when I let him, so he cut out the overalls.  Then he let me cut out the hat and the shirt.  Then he glued them all on his person.
Here is his scarecrow.
Here is his friend's scarecrow (yes she likes pink). 

Monday, November 21, 2011

Tuesday Tot Craft Time: Turkeys

Here is a fun craft that we did at the library on Friday.  First my son traced my hand on the paper.  Then he placed his hand inside of the drawing of my hand, and I traced his hand.  Next he glued the body of a turkey over our hand prints.
Then he colored his turkey.  The two hand prints are the feathers.  
Then during school, he made a turkey with 10 feathers.  The feathers are a way to practice his speech.

I hope that everyone has a nice Thanksgiving week.

Monday, November 14, 2011

Tuesday Tot Craft Time: Kitty

This is a super cute project to make.
The supplies are cat faces on card stock, markers, 3 popsicle (2 cut in half), scissors, 2 chenille stems, and either glue or glue dots.  
My son colored all the parts separately.
And then we assembled all the parts with glue dots.  For the tail we twisted two chenille stems together and glued them to the back of the body.  When we got home we glued magnets to the back of the cat.  I think that it is really adorable.  This project was inspired by the librarian's cat.

Saturday, November 12, 2011

Purple Crochet M&M Minis Cozy

I have been crocheting this cozy for a few weeks.  I finally finished it today.  It took a long time because I used thin crochet thread and a 1.90 mm crochet hook (size 5).  I used a modified spiral pattern to create the stripes, that way the stripes are seamless.  I slipped stitched the last round, which makes it stay on easier.  This cozy and empty container is for my swap partner who likes purple.  She can put small craft supplies in it, like sewing needles, buttons, stitch markers, etc.
The cozy was a little to plain, so I added a flower made on the peg loom to it.  I used the same 2 colors of purple, and wrapped them around the loom 3 times (thus getting a 6 layered flower).  Then I used 2 strands of the lighter colored purple thread for the center.  Next I added a dot of black glitter glue to the center of it.  My partner likes the color black as well.  
Here name starts with the letter B, so I turned the M on top of the M&M minis container into a B with some black glitter glue.  Why did I choose the lime green container?  I asked her grandmother (who I am friends with) which color she would prefer: red, light blue, green, or orange.  Those are the colors that I have been able to get a hold of with the M&M minis.  I hope that she likes it.  I really like it, and now I want to make one for myself.