Sunday, August 30, 2009

Bamboo yarn long scarf


It is day 7 for me of the eco craft challenge. My in-laws were here for the weekend; so, I wanted to choose something simple to work on. Why not work on a UFO (unfinished object)? I started knitting the bamboo yarn that I bought on my trip to Missouri last month while on the road. I haven't really touched it since I've been home. It is a simple garter stitch scarf on size US 9 needles. I used 2 long skeins to make it. I can wrap it around my neck twice and it is still nice and long. The yarn is very soft. This is the perfect scarf for New England weather.


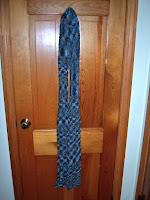
This craft challenge is the perfect reason for all of you to work on your UFOs. What's holding you back from finishing them?

As a side note... I was zapped today. I wanted a little pick me up. I wanted to run to the fabric or the craft store to buy a little something to cheer me up. I was near both stores today, but resisted the urge. I want to keep my spending under the $20 limit for the challenge. Some how I got into the habit of buying craft supplies as part of an effort to lift my spirits. However when I finish a project and have a new product to show for it, I'm proud of myself. It brightens my day. Producing new objects, finishing UFOs, and decluttering my home by stash busting are my goals for this challenge. They are what keep me on track and motivated. There are so many projects that I want to tackle, but I need to focus and take it one project at a time. I did spend $2 of the budget on glue the other day. I needed it to line the inside of the milk carton wallets.

Friday, August 28, 2009

Milk Carton Wallets

Today is day 5 of the eco-craft challenge for me. I've been trying to create something everyday. This does not mean that I have a product made everyday though. Some days I do a lot of prep work. Everyday I knit a few rounds of my yellow plyarn tote bag. I am really trying to make a dent in my recycled stash (soda tabs, plastic bags, potato chip bags, juice pouches, etc.).


Today I wanted to make a dent in my milk and juice carton stash. A while back I made a milk carton wallet as shown in Family Fun magazine. Since then I have been saving my empty (and cleaned) milk & juice cartons. They take up space though. So today I printed the template for the wallet from the Family Fun website. I then opened up all of the milk cartons that I had saved.

I traced the template onto each one. Then I cut out the shape and the circle at the bottom.

Using a small crochet hook, I traced the fold lines onto the milk carton. Then I folded them with the help of a ruler. I want to line the inside with some nice paper or fabric. The problem is that I can't find any glue. That's why there is a small budget for the challenge.

One panel of the carton is not used. I thought about cutting them the same size, covering them, and making a book. It can either be for the outside of a book or all the panels can make a type of board book. Does anyone else have any ideas of what to use these panels for?

Another use for the milk cartons is making building blocks for toddlers. You open the top of the carton and clean it out. Stuff newspaper or other scrap materials inside of it. Fold the top so that it lays flat like the bottom, and tape it down. Then cover the carton with either contact paper or wrapping paper. You can cover that with clear packing tape to make it last longer (because kids like to tear the paper off).

Wednesday, August 26, 2009

Day 3 of Eco-Craft Challenge

Thank you to everyone who is participating in this challenge! I know the numbers aren't reflected in the poll right now. About 10 people in the Stash N Burn Ravelry group are doing this challenge.

I went into my scrap fabric bin and pulled out several green and blue fabrics. I pieced them together to make a larger piece of fabric. Then using my favorite pot holder for size, I cut 6 pieces of this new large fabric. I sandwiched 2 layers of batting in between 2 of the cut fabric sheets. I then quilted them together in a diagonal grid pattern. Later I will make a binding to finish it.

I think the pot holders will be fun and funky. I'm not sure if others will like them as much. I'm not sure if people would like them as gifts. Personally I like that I made something useful out of scraps. Even the batting was scrap from a quilt project.


I took my toddler to the library, because I had a book on hold. While he played in the children's section, I worked on my knitted plyarn tote bag.

Monday, August 24, 2009

Eco Craft Challenge: Day One


I am putting out a challenge for all of you crafters out there. For 30 days I want you to use what you have in your house to craft with. For this 1st challenge you have a budget of $20 for the 30 days. That is less than a dollar a day. Try to not spend any money. However you might need small items like snaps, buttons, a zipper, batting, etc. to complete your project. Thats why you get a budget.

The purpose of this challenge:
1. Save money!
2. Save gas = help the environment.
3. Get those creative juices flowing.
4. Decrease the amount of stuff that you have just sitting around.

I have so many things in my own home that I can use in a variety of different craft ways. Why then am I buying more things? I set this challenge not only for anyone who is interested in participating, but also for myself.


Today I worked on making plyarn. I also took the
scraps (the handles and seams) and fused them. I'll figure out what to make out of that at a later date. I have a few ideas though.


I discovered 4 produce bags with corn and yams on them. I fused them together. There was some white fabric in my stash that I used for the lining. I then used some corn fabric from my stash for the strap. I spent $0 on making a new bag.


How to make plarn

What is plyarn? Yarn that you make from plastic bags.
Tarn is t-shirt yarn.


1. Flatten your clean plastic bag.


2. Cut off the handles and bottom seam. You can't use them for plyarn. Save them and use instead of packing peanuts or fuse them and make something new.


3. Open the folded sides, then fold from fold to fold a few times.


4. Cut bag in 1" strips.


5. These strips form loops. Put loop A inside of loop B. Put one side of loop A through the other side of loop A. Gently pull. This is how you join them without tying knots.


6. If one breaks, use it to join 2 other loops with. Put it through 2 loops and tie a knot with the broken strip. Now 3 loops are joined.


7. Now make a ball of plyarn. Knit it. Crochet. Weave it. Gift it.

It's Easy Being Green: Dates & Times on local TV

"Its Easy Being Green" will be on Channel 8 on Wed. Aug. 26th at 9am, and Sat. Aug. 29th at 6pm. It is episode 2: Quilting.


The new episode on fusing plastic bags airs on Tues. Sept 1st at 6:30pm & Sept. 5th at 6:30pm.


The show can be viewed in and around Chelmsford, MA or on youtube.

The show might be going from 2 episodes a month to one a month. I am hoping to keep it at two a month.

Sunday, August 23, 2009

4 ply spun brown plyarn

Yesterday was full of spinning plyarn. I spun my ball of brown with some cream plyan. After spinning the whole ball, I spun again using the 2 ends. Plyarn is usually 2 ply. I ended up making a 4 ply ball of plyarn. I really like the look of tightly spun plyarn. I doubled it to provide extra strength. Last night and this morning I began crocheting a round bag from it. I am using a metal size I crochet hook. I say metal, because the plyarn is easier to work with metal needles/hooks vs plastic ones. I got as far as making the bottom of the bag and a few rows of the sides before my plyarn ran out. Some of the bags look like copper. The cream makes an interesting ring on the bottom of the bag. I really like the way this looks. Spun plyarn is harder to work with than regular plyarn. However this 4 ply spun plyarn seems much stronger than regular plyarn.

Saturday, August 22, 2009

Eco Craft Magazine

There is a new magazine called Green Craft Magazine. Volume one is available at Borders (and probably other places). Is costs $15 US. It is thick and full of great eco-crafts.

Delving into my plyarn

I first went down to my basement studio to clean up. After putting things away and doing some general sweeping, I looked at my corner pile of plastic bags. People who know me give me their stash of plastic bags. I have a never ending supply of them it seems. I am not complaining. The plastic bags do take up a lot of space though. I wanted to sit down and make some plyarn. By making balls of plyarn, I increase my free space.

However I noticed that a bin that I store my cut plastic loops in was to full to add more to.

So then I went about joining the loops and making the ball of plyarn.

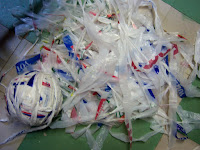
I got bored after a while, so I started spinning the ball of plyarn. I alternated between joining the loops and spinning them.

It was very relaxing, plus I got to listen to a really wonderful podcast. It was CraftSanity episode 102, interview with the Beerhorst family (a family of artists).

Friday, August 21, 2009

Back to school - juice pouch pencil pouch

After going shopping for school supplies, my son asked me if I could make him a pencil pouch out of juice pouches. Since then my mind has been thinking of different back to school items that I could make out of juice pouches. Today I went to work on making the pencil pouch.

Supplies to make 1 pencil pouch:
-Goo Gone
-paper towels
-9 juice pouches
-14" zipper
-sewing machine, thread, and denim needle
-scissors
-hole punch
-3 gromits & a hammer


1. Cut the bottom (expandable part) of the juice pouches and clean them. Let them air dry for about 2 days until there is no water left inside.
2. Peel off the remaining plastic from the straw.
3. Lay them out on a table and spray some Goo Gone where the straw was attached on each one. Let it set for 1 minute.
4. Using a paper towel, clean off the sticky straw part as well as the Goo Gone.
5. Sew the 9 juice boxes together in 3 rows of 3. I like to use a zig zag stitch. Straight stitches seem to tear easily. Grey thread goes well with most juice pouches.

6. Sew the zipper onto both ends.
7. Fold the juice pouches in half, close the zipper, and sew the sides together.
8. Using a 3 hole punch, punch holes near the folded edge. If no 3 hole punch, mark where the holes go, then make the holes.
9. Make sure the gromits fit through a 3 ring binder easily. Then follow the directions from the gromit package to attach them.


I also took my fused messenger bag to the fabric store this morning. I choice a button that fit the best with my bag. I also bought some large snaps. I attached the snaps and the button to finish the bag.

Thursday, August 20, 2009

Farmers' Market, knitting plyarn, & my fused messenger bag.


I volunteered at the Farmers' Market today. It was so hot that when a short burst of rain came down, my kids ran around in it and got soaked. I always look forward to dinner after shopping at the Farmers' Market.

I also brought my knitting with me. This is the yellow plyarn that I had spun. I am knitting a market bag with it on size us8 circular needles. The 1st 30 rows are knit normal for the bottom of the bag. Then the pattern goes into the round. I got to row 29 when it started raining.


Someone from the recycling comity gave me a giant ADOPT-A-ROAD garbage bag. I love it! Yesterday I fused the bag as is (2 layers). I then folded the sides to the middle on the back side, and then fused them down. That made 4 fused layers. Today I pinned the bag to some black fabric, right sides together. I then stitched 3 of the sides together. I cut the excess fabric off. I turn it right sides out, folded in the 4th side and stitched it in place. I then made a strap out of the black fabric. I pinned that in place. I folded the bag how I wanted it with the fabric on the outside (right sides together), and sewed the edge seams and the straps. Then I turned it right side out. I love it this messenger bag. All I need to do is add a snap in the middle and find the perfect button to place over the snap.

Wednesday, August 19, 2009

Knitted Dishcloth


I finished knitting the "figure eights" dishcloth last night. It took me a few hours, and it could have been made in one day. I worked on it at night while watching tv, so it took me 2 nights to knit. The book is called "Nifty Knit Dishcloths" by Leisure Arts. There are 16 designs in this thin book.

I started knitting the "green living tote" from lionbrand.com last night. I got through 7 painful rows before my toddler woke up and needed to be put back to bed. I say painful, because my fingers really hurt from it. While sitting in the dark, trying to put my toddler back to sleep, my brain started thinking of the tote pattern. I realized that I was not suppose to be knitting it in the round yet. The base is knit in regular rows, and then you knit in the round. I was grateful for my little one waking up. Otherwise I would have not realized that I was knitting it wrong. I ripped out all the rows and put it aside. I needed my fingers to recover a bit. I still wanted to knit, so I finished knitting the dishcloth. Then I started knitting the tote bag again. I got as far as casting on and knitting one row before my toddler woke up again. I'm looking forward to making a plyarn bag from a pattern. Normally I just make a rectangle, attach a ribbon handle, and crochet up the sides.

Monday, August 17, 2009

Knitting Dishcloths


All of these dishcloths were knit with Lily's Sugar'n Cream cotton yarn with size US 7 needles.

The brown set I knit while visiting my parents last week. One I cast on 36 stitches, and then I just knit every row. The other one I cast on 3 stitches. I knit every odd row, and I would either increase or decrease the 2nd stitch from both ends on the even rows. Increase: knit in front and then in back of stitch. Decrease: knit 2 together.


The green striped dishcloth was a knit one below stitch pattern. I cast on 36 stitches. I knit the first and the last 2 rows. All even rows are knitted
across. The pattern repeats after 4 rows. Row 3: k 2, (k 1 below, k1) repeat, k 2. Row 4: knit. Row 5: k2,(k1, k1 below) repeat, k2. Row 6: knit. Repeat rows 3 - 6 to desired length.


The blue one on the needles is the figure eights pattern that is found in "Nifty Knit Dishcloths" by Leisure Arts. There are 15 dishcloths in this thin book. I plan on knitting each one. I started this dishcloth last night.

I love my knitted dishcloths. Since they have holes in them (just from being hand knit), they dry without smelling bad after using them. They clean tough counter surfaces great. They are gentle on my dishes. They look great. They make great gifts. They are environmental (they are reusable).

Saturday, August 8, 2009

Fused Subway Bag

I fused 4 Subway kid's meal plastic bags together. I fused two together. Then I fused 2 others together. Then I placed some paper between the two so that only 3 of the edges would fuse together. I was able to make a bag without sewing. However I am going to go back and sew them together, because the top edge of one side is to easy to pull apart.

When fusing, sandwich the plastic bags between some parchment paper. Set the iron to a wool / silk setting. Cotton is to hot and will burn a hole in your plastic.


Friday, August 7, 2009

It's Easy Being Green: Episode 2: Quilting, Grandma's Flower Garden.

You can watch the show on youtube: http://www.youtube.com/user/Textiles4you

It is in 3 video clips, because youtube only allows 10 minute video clips to play.


The instructions are pretty simple. However if you have any questions, please feel free to ask.

Update


I've just been knitting that same scarf. I'm on my 2nd skein. I have also been helping out at the recycling table at the Farmers' Market. My husband was working on uploading my 2nd show on to you tube last night. Its hard since you tube only allows 10 minute videos, and the show is 30 minutes long. My name on you tube is textiles4you, you you want to watch any of the videos. If you live in Chelmsford, than you can go to the telemedia website to find out when my show will be on channel 8. It's called "Its Easy Being Green. I will start taping more shows in 2 weeks. My next topic will be Fusing plastic bags. I am also trying to line up a few interviews / guests.

Saturday, August 1, 2009

Bamboo scarf


I bought some bamboo yarn while in Missouri this summer. I started knitting it while on the road trip home. I've been working on it off and on during late night movies or tv shows. Today I worked on it while my husband drove us around for errands. I just finished one skein. I was smart enough to buy 2 skeins. I am debating on whether or not to make a matching hat. I am sure that I have enough, because the scarf it already pretty long. Or maybe I should just make a super long scarf. What do you think? I am using size US 9 needles that I also bought in Missouri. They look like glass needles with a blue ribbon twist in side, but they are plastic.