Thursday, September 30, 2010

Knitted Scrubbies


I have been knitting all of these scrubbies since last month.  Not all of them are shown here.


They are Christmas presents.


The pattern is here, however I double it.  I cast on 36 sts and knit 40 rows.


This is what I make when watching a movie or an interesting t.v. show, because the pattern is that simple.

Paper Pieced Heart Blocks


This year my quilt guild is having 2 kinds of box exchanges.  A box exchange is when you find a block pattern, add any extra instructions to it (like color choice, placement of color, etc), possibly add one or two pieces of fabric from your stash, and then put it in a numbered box.  The box gets passed to a different person each month, and they make one or two blocks for your box according to your directions. In turn, you work on a different person's box every month.  Then in April or May we pin the blocks on fabric and display them at the quilt guild meeting.  It is also the first time that you get to see your blocks since October.  It is a lot of fun.  No one knows whose box is whose.  And after a few months, you have several finished blocks that contain fabric from other people's stashes.  The thing that is different about this year's box exchange is that one is a pieced block (like last year) and one is a paper pieced block.  I signed up to do both.


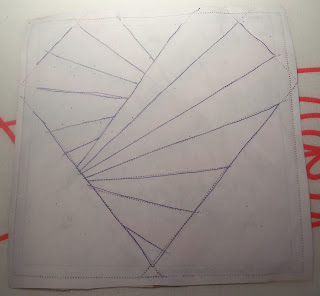
This week I picked out this heart paper pieced block, and I made four blocks for my box.  Now I just need to add what colors I want the people to use when making it, put everything in a bag, and bring the bag to the next meeting.


These are the blocks from last year's box exchange.  I made the two center log cabin blocks.  The theme is Valentine's Day, thus the heart shape.  I want to continue this theme with the next two box exchanges so that I can add those blocks to this quilt.  That is why I picked a heart design for the paper pieced block.  I also found a nice heart block for the regular pieced block box exchange.  I'm not to concerned with the size of the blocks being the same as the log cabin one or the same as each other.  I am letting this quilt form more organically.   I can always add borders around blocks to make them work with one another.

Here is a link to a good video tutorial on how to sew a paper pieced block.  It is a great way to use up your scrap fabric.

All the fabric for these blocks are from my stash.  The purple fabric I bought in high school (over a decade ago).  I really love making holiday themed quilts.  What I like to do is buy the holiday fabric when it is on sale after the holiday.  A lot of fabric stores will have the holiday fabric 15% to 40% off before the holiday, but after the holiday you can get it 40% to 90% off.  Just a little tip.  Now to make the other heart block.

Wednesday, September 29, 2010

Hoop Jack-O-Lanterns


Normally I don't like to make long blog posts, but sometimes it is necessary for a tutorial.  Be on the look out for a video tutorial on how to make these hoop jack-o-lanterns in October.  The technique that I used to make these jack-o-lanterns is called reverse applique.  It is a quilting technique that I learned how to do last year.


You will need an old shirt or felted sweater that is orange, an embroidery hoop frame, black felt, a green pipe cleaner, and a black marker.  You will also need some black paint, black thread, a sewing machine, an open toe presser foot, and scissors that are curved at the end (pictured further below).


I painted the top/outer hoop black.


Lay the felt on top of the hoop.
The felt is eco-fi felt, which is made from recycled plastic bottles.


Lay the shirt over the felt and the hoop, then place the outer hoop over them (sandwiching the layers together).


Trim off the excess fabric.  
You might want to leave some of the excess fabric around the small hoops.
You'll see why further below.


Draw fun faces on them as you would a pumpkin.
I did a google image search for Jack-o-lantern faces to get more face ideas.


You'll want to use an open toe foot on your sewing machine so that you can see the marker line.  Also set the straight stitch smaller / shorter than normal (more stitches per inch).  Then sew over all of your marker lines.


Here is the back.


You will need a pair of these scissors for the next step.  Notice how the end in curved up.


Make a hole through the top layer of fabric with the tip of the scissors.  Butt the scissors against the sewn line and cut.  See how one side of the scissors is under the 1st layer of fabric and the other side is on top?  By cutting against the sewn line while the scissors are flat against the surface, you can cut out the 1st layer of fabric within your line without cutting your stitches.


Here is the mouth completely cut out.  Now we can see the black felt showing through.


Cut out the rest of the face.


Next you need to sew a satin stitch around all of your cut edges.  I have mine set at 2 wide and 0.5 long (Bernina 220).  Play around with this stitch on a scrap piece of fabric first to see what length and width that you like best.  If you are sewing two layers of felt together, then you can choose any decorative stitch.  The felt won't fray, but regular fabric will.  So I needed a satin stitch to make sure that the shirt didn't fray.


A close up.


When finished, flip it over and run glue around the hoop to secure it and the fabric.


The smaller hoops are just to small for the sewing machine.  So pin the 2 layers of fabric together and take them out of the hoop.


Repeat the above steps.


Then place it in the hoop, trim the excess fabric, and glue around the back of the hoop.


For the green stem, just insert the pipe cleaner through the center of the hoop's clasp (that metal part at the top).  Fold it in half and give it one or two twists to secure it.  Then wrap each end around a fat marker to curl it.


Now you have some really cute Halloween decorations for your wall.  My quilt guild really liked these, and so does my husband.  My favorite part is that you can make these for less than $10.

Wordless Wednesday: Too Many Bees


We see that the spider made a larger web at 8 a.m. this morning.


The same web at noon.


Plenty to eat.


Where did the surge of bees come from?  They are everywhere!


Maybe not so wordless today.  My older son is going to love this.


Knitting with leftovers while waiting in the car (it was parked).  

Tuesday, September 28, 2010

Tuesday's Tot Craft Time: Haunted House


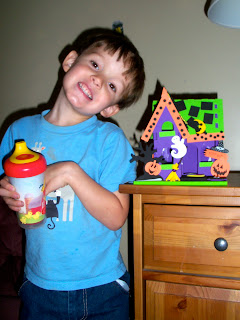
About 2 or 3 years ago I bought two foam Halloween kits during the after Halloween sale.  My oldest wasn't interested in making them, so they sat in storage.  When going through our box of Halloween decorations yesterday, my 3 year old found them and wanted to make them.


Of course I had to put the haunted house together, and then we had to wait for the glue to dry.  But then he got to decorate the house.  Thankfully most of the decorations were stickers.  There was some glueing involved though.


He had a lot of fun decorating it, and now we have another cute Halloween decoration for years to come.


When picking these foam kits, remember that you might have to do the prep work.  Look carefully at it and see if your child can actually help make it or at least decorate it.


We ran into that problem with the pirate ship.  It was a pain in the butt to put together.  I had to hold items in place while the glue dried.  Then there was barely anything to decorate it with.  So my son didn't actually work on it.


But he still likes it.  Here he is being a monster.

Monday, September 27, 2010

Halloween is in the air


Something about today just screamed "decorate for Halloween."  So that is exactly what I did, both indoors and out.  My 3 year old had so much fun helping me decorate.  About 80% to 90% of my decorations were purchased on sale after Halloween in years past.  It is a great way to save money and still get great looking decorations, you just have to wait a year before using them.


Here is a sneak peak of of what I've been making today.  This is a reverse applique jack-o-lantern face using an old shirt, felt, and an embroidery hoop.   I showed 3 of these during show-and-tell at my quilt guild meeting tonight.  I got a lot of nice comments on them.

Sunday, September 26, 2010

Sunday School: Being Good Stewards of the Earth, week 1


Today was week one of the first Sunday School rotation of the year.  I am teaching the kids about being good stewards of the Earth, our 7th principle.  Here is my show-and-tell set up.  I ask the kids what they think different items are made out of.  I was really impressed that someone out of the group was able to guess the really hard ones.


I had four 4th graders today.  We made plarn (plastic bag yarn), plastic bag wreaths, and drew on plastic bottle caps to use as decoration for the wreath.  When finished, the plastic bag wreath will be up for sale in the church's holiday fair.  I also showed the kids how I spin plarn on a Navajo Spindle.


I  brought several books and magazines that are all about eco-crafting.  There were coloring pages as well.


Here is one girl's ball of plarn.


Here are the coloring pages that the church provided that goes along with being good stewards of the Earth.


Here is the tri--fold chalkboard in use today.  I got a lot of nice comments on it.  I saw little light bulbs turn on over people's heads when they realized that it is really easy to turn things into a chalkboard.

Basically I had a really good morning.  I hope all of you are having a good Sunday to.